
Ok maybe it's not a minefield, but there's still quite a few gotchas when trying to build a Weld application to run in Google App Engine. Since I'm currently renovating my house I decided that it would be fun to blog about the experience (a software guy doing physical labour? weird!!) and it only made sense to kick the GAE tyres to see what all the hype was about. Google have done a great job providing a richly featured cloud platform with plenty of good documentation and a helpful online community, and the free quotas they provide are more than enough for the average low traffic web site.
If you are a typical Java EE developer like me though, you have to approach GAE development with a slightly different development mindset. This article will guide you through the step by step process for getting a Weld-based application running on GAE, and help you to avoid some speed bumps along the way. To get started, you'll need just 2 things - a JDK and Eclipse. For the rest of the stuff that you'll need I'll explain as we go along.
This article is rather large and as such will come in two parts; part 1 will cover project creation, configuration and deploying a minimal app to GAE, and part 2 will dive into some of the issues faced when developing an application.
Oh, by the way if you want to see an example Weld app running on GAE (and see me getting my hands dirty) then you can check out my site at http://www.renovatorsblog.com.
Downloading the Google App Engine SDK Eclipse Plugin
I consider the GAE SDK to be an essential ingredient for GAE app development. It handles all the work of setting up your project, enhancing your entity classes, running your app in local development mode and even deploying your app straight to the production GAE environment.
To install the SDK plugin for Eclipse, you can follow the instructions here:
http://code.google.com/appengine/docs/java/tools/eclipse.html
For the impatient though, here's a summary of the installation steps (for Eclipse 3.5):
- Click the Help menu -> Install New Software
- In the
Work with
box, enter http://dl.google.com/eclipse/plugin/3.5, then click the Add button then click OK. - Expand the Plugin entry and check the 'Google Plugin for Eclipse 3.5' item, then expand the SDKs entry and check the 'Google App Engine Java SDK 1.3.0' item.
- Click the Next button, and accept any terms of service.
- Click the Finish button, wait for installation to complete and then when asked if you want to restart Eclipse, select 'Yes'.
Create an App Engine account
If you don't have one already, then you'll need a GAE account. They're free, all you need is a Google account. So go to the following page and sign up:
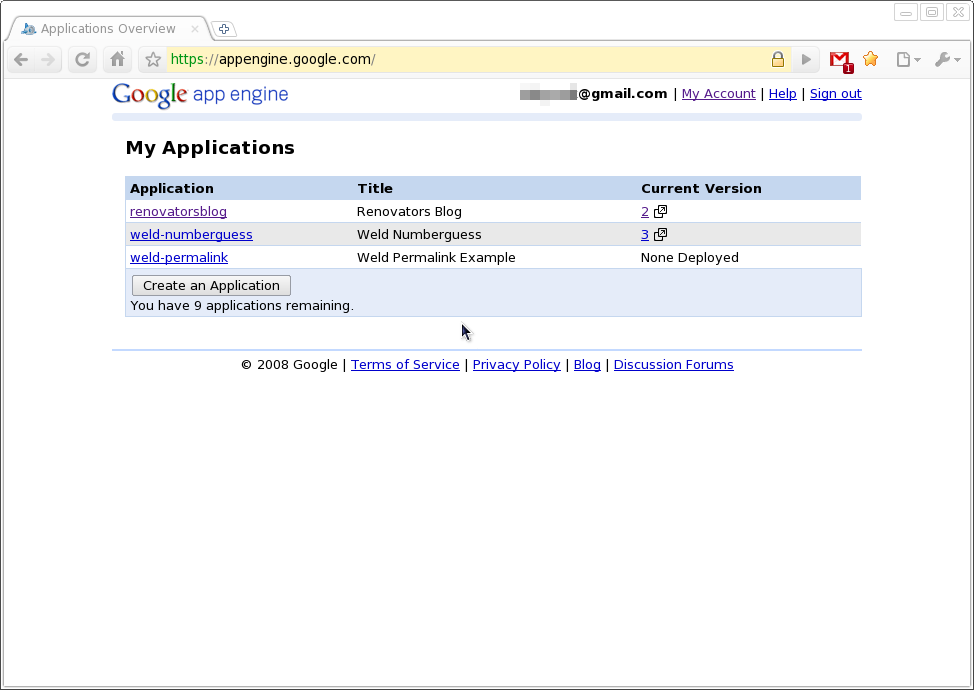
Once you've done that, you should be presented with the 'My Applications' screen, containing an empty list and a 'Create an Application' button:
Create an Application
To be able to deploy an application to GAE, you need to give it a unique application identifier. Clicking the 'Create an Application' button will take you to the following screen, where you can enter your application identifier and a title for your application.
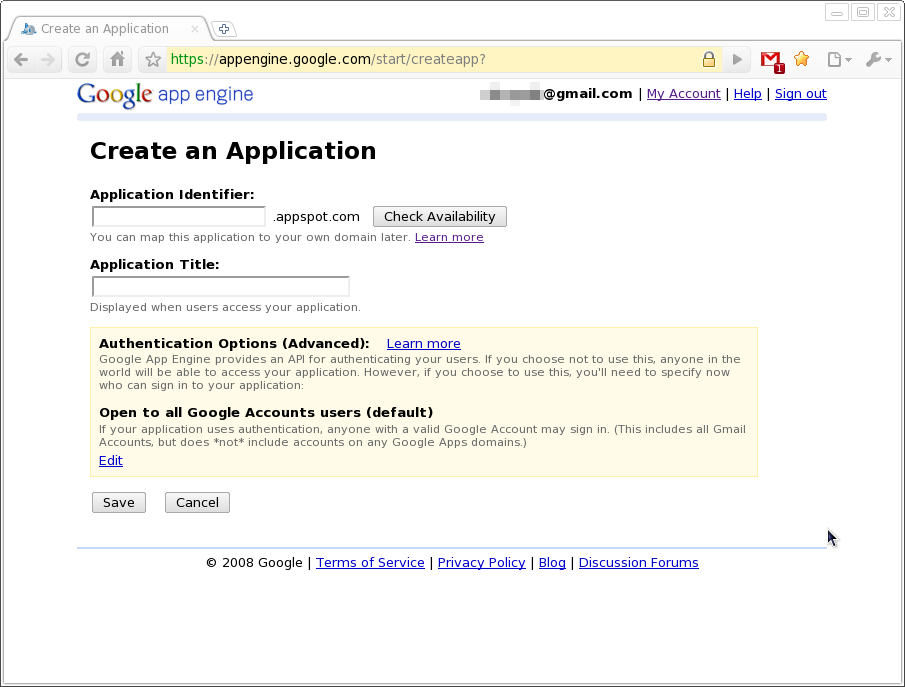
For the authentication options, you either have the choice of using Google Accounts which allows anyone with a Google account to sign in, or you can restrict your application just to the users of a Google Apps domain. We're going to choose door number one, and allow any user with a Google account to sign in.
Of course, if you don't want to then you don't have to require your users to sign in to your application at all (by not specifying any security restrictions for your pages, which we'll get to a bit later). If you do want some kind of security though, the advantage of using the Google accounts API is that you don't have to worry about building the screens, creating user/role entities, writing action code, etc for managing the users in your app - Google takes care of all that for you.
Creating the project
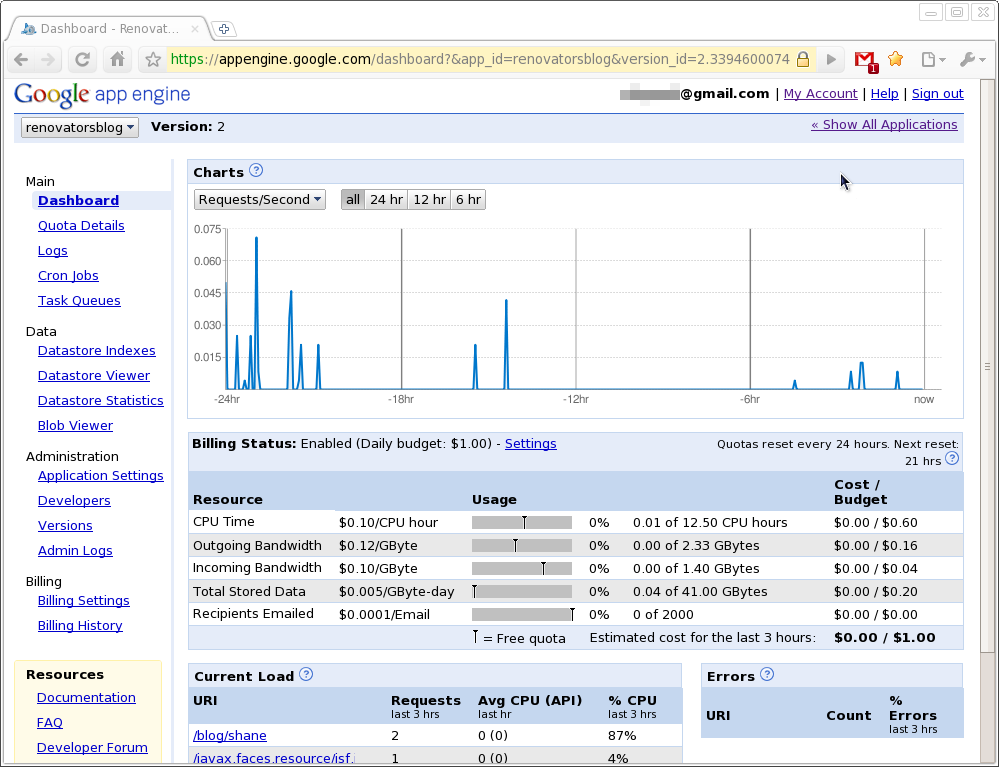
Once you've created a new application with a unique application identifier, you'll be presented with an 'Application Registered Successfully' message. Click the 'View the dashboard...' link to view the dashboard for your new app:
Now that we've created our new app, it's time to create the project. In Eclipse, click File -> New -> Web Application Project to get the following dialog:
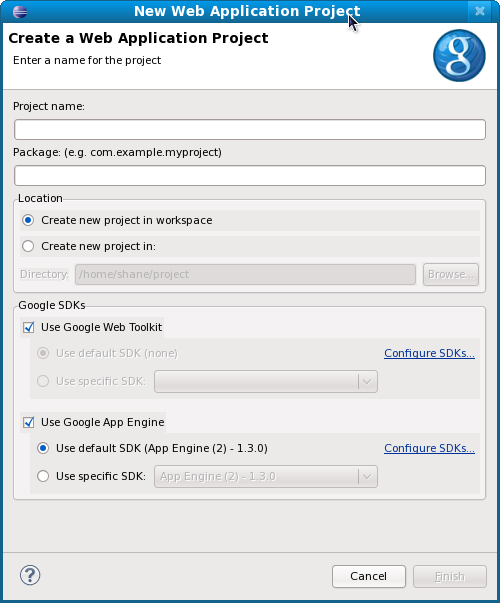
Enter a project name and the default package for your classes. Uncheck the 'Use Google Web Toolkit' option (we'll be using JSF 2.0 for our view) and then click Finish to create the new project. Then, right click on the new project in the Package Explorer and select Google -> App Engine Settings.
In the 'Application ID' box, enter the unique application identifier that you registered for your application. For the Version, just enter 1, then click OK to save your settings. The values actually get saved in /war/WEB-INF/appengine-web.xml, so open this file up now and take a look at what it contains. Actually, there's one more setting you need to add to this file, to be able to support user sessions in your app. Add the following line to the file:
<sessions-enabled>true</sessions-enabled>
The complete file should look something like this:
<?xml version="1.0" encoding="utf-8"?>
<appengine-web-app xmlns="http://appengine.google.com/ns/1.0">
	<application>myapplication</application>
	<version>1</version>
	<sessions-enabled>true</sessions-enabled>

	<!-- Configure java.util.logging -->
	<system-properties>
		<property name="java.util.logging.config.file" value="WEB-INF/logging.properties"/>
	</system-properties>

</appengine-web-app>
Configuring JSF
Like any servlet-based application, the web.xml file is where most of the important stuff is configured. JSF requires quite a lot of config, so let's look at the options one at a time. By the way, Google actually have some documentation on configuring JSF 2.0 for GAE, so if you're interested you can check it out here.
The first thing we need to do is disable some of the multi-threaded stuff in JSF, as GAE doesn't support multi-threaded applications. Add the following two entries to /war/WEB-INF/web.xml:
  <context-param>
    <param-name>com.sun.faces.enableMultiThreadedStartup</param-name>
    <param-value>false</param-value>
  </context-param>

  <context-param>
    <param-name>com.sun.faces.enableThreading</param-name>
    <param-value>false</param-value>
  </context-param>
Next, we need to configure the Faces servlet. This will alllow requests that end in the .jsf suffix to be handled by JSF:
  <servlet>
    <servlet-name>Faces Servlet</servlet-name>
    <servlet-class>javax.faces.webapp.FacesServlet</servlet-class>
    <load-on-startup>1</load-on-startup>
  </servlet>

  <servlet-mapping>
    <servlet-name>Faces Servlet</servlet-name>
    <url-pattern>*.jsf</url-pattern>
  </servlet-mapping>
Next, we need to configure EL:
  <context-param>
    <param-name>com.sun.faces.expressionFactory</param-name>
    <param-value>com.sun.el.ExpressionFactoryImpl</param-value>
  </context-param>
Finally, there's a couple more options recommended by Google. From what I've read, version 1.3.0 onward of the SDK now supports server-side state saving, however I haven't tried it yet so let's just leave it as client-side for now - the reason for this is to avoid a DatastoreTimeoutException issue that can possibly render a user's session broken until their session has expired (there's a Google Groups thread on this subject here if you're interested).
  <context-param>
    <param-name>javax.faces.STATE_SAVING_METHOD</param-name>
    <param-value>client</param-value>
  </context-param>
The following option is mentioned on the JSF 2.0 and GAE compatibility issues page, and is required to prevent a ConfigurationException from occurring because of a threading issue:
  <context-param>
    <param-name>javax.faces.PROJECT_STAGE</param-name>
    <param-value>Production</param-value>
  </context-param>
Once you've added all these options to web.xml, you can also create a faces-config.xml file in the WEB-INF directory also. Since JSF 2.0 this file isn't actually required, but since we'll be putting our navigation rules there later on it won't hurt to create it now. Thankfully in JSF 2.0 there is minimal configuration required here, basically an empty file:
<?xml version="1.0" encoding="UTF-8"?>
<faces-config version="2.0"
   xmlns="http://java.sun.com/xml/ns/javaee"
   xmlns:xsi="http://www.w3.org/2001/XMLSchema-instance"
   xsi:schemaLocation="
      http://java.sun.com/xml/ns/javaee
      http://java.sun.com/xml/ns/javaee/web-facesconfig_2_0.xsd">
</faces-config>
Adding the JSF libs to your project
Due to the way that JSF 2.0 checks if it can use InitialContext (see the processJndiEntries() method in WebConfiguration.java - there are certain Java classes that aren't supported in GAE, the ones that are can be found in the JRE whitelist), we need to use a hacked version of jsf-impl.jar that comments out the body of the processJndiEntries() method. You can download a modified jsf-impl.jar from Josh Carrier's blog, direct link here:
Once you download it, place it in the WEB-INF/lib directory in your project. You'll also need jsf-api.jar, which you can get directly from the following link. Once you get it stick it in the WEB-INF/lib directory also.
We'll also need to download the EL libraries. I couldn't really find an official download page just for EL, so just download them straight from the java.net Maven repository:
- http://download.java.net/maven/2/javax/el/el-api/2.2/el-api-2.2.jar
- http://download.java.net/maven/2/org/glassfish/web/el-impl/2.2/el-impl-2.2.jar
Once you download them both put them in the WEB-INF/lib directory.
Configuring Weld
The configuration for Weld is quite simple, all you need to do is add the following entry to web.xml:
  <listener>
    <listener-class>org.jboss.weld.environment.servlet.Listener</listener-class>
  </listener>
Next, create an empty file (no contents whatsoever) called beans.xml in the /war/WEB-INF directory. This is so Weld can find your beans. Getting the Weld libs is a little more work, unfortunately. We've made a few fixes to the Weld code to address some issues with running in GAE, so you can't use the 1.0 download. The option here is to either a) build it yourself (which I'll go through the steps for in a moment, since you might be impatient ;) or b) wait for the 1.0.1.RC2 release, which should be out any day now.
Building Weld from SVN
Compiling the Weld libs from source is really not as scary as many people think, all you need is an SVN client and Maven 2. We only need the weld-servlet module, so start by checking it out from SVN:
svn checkout http://anonsvn.jboss.org/repos/weld/servlet/trunk/
Once you have it checked out, you can build it by running mvn clean install. Once it's built, copy the weld-servlet-xxx.jar file from the build/target directory into the WEB-INF/lib directory of your project. This is the only jar file you need to add to your project for Weld support.
With all the required libraries now in your project's WEB-INF/lib directory, do a refresh in Eclipse (either press F5 or right click on your project and select Refresh) then go into the Java Build Path page (right click on project -> Properties -> Java Build Path) and click on the Libraries tab. Click the 'Add Jars' button and browse to your project's war/WEB-INF/lib directory and select weld-servlet.jar, then click OK. This will allow us to use the CDI annotations in our classes.
Hello World
Now that we've got our project set up and all the required libraries in place, it's time to write some code. Just to ensure that everything is working ok, we're going to start with a simple Hello World example. First of all, create the following bean class in your new project:
import javax.inject.Named;

@Named
public class HelloWorld
{
   public String getMessage()
   {
      return "Hello, World";
   }
}
Next, create the following JSF page in the /war directory (call it helloworld.xhtml):
<?xml version="1.0" encoding="iso-8859-1" ?>
<!DOCTYPE html PUBLIC "-//W3C//DTD XHTML 1.1//EN" "http://www.w3.org/TR/xhtml11/DTD/xhtml11.dtd">
<f:view xmlns="http://www.w3.org/1999/xhtml"
   xmlns:ui="http://java.sun.com/jsf/facelets"
   xmlns:f="http://java.sun.com/jsf/core"
   xmlns:h="http://java.sun.com/jsf/html"
   contentType="text/html">
<html>
  <head>
    <meta http-equiv="Content-Type" content="text/html; charset=UTF-8"/>
  </head>
  <body>
    #{helloWorld.message}
  </body>
</html>
</f:view>
Running your app locally
To take your new application for a test run it's best to try running it locally before you deploy it to production. Right-click on your project, then click Run As -> Web Application. You should see a few log messages as the servlet container starts up, and then the following message:
The server is running at http://localhost:8888/
Once you see this, it means your app is up and running. Open your web browser and go to http://localhost:8888/helloworld.jsf. If everything is in order you should see the following page:
If you see this page, then congratulations! It's time to deploy your app to the GAE production environment. If you don't see this page, then go through all the previous steps to make sure you haven't missed anything. After that, if you still can't get this page to display then post a comment describing where you're stuck and we'll try to help you out.
Deploying to Google App Engine
Now it's time to deploy your application. Right click on your project, and select Google -> Deploy To App Engine. You will be prompted for your Google accounts username and password, so enter them here. After entering them the deployment process will take a little while complete, but eventually you'll get a 'Deployment completed successfully' message.
To see if your deployment was successful, go to your web browser and open your application page - Google apps are deployed to <app-id>.appspot.com, where the app-id is your unique application ID. For example, if your application ID is joeblogshelloworld, then your application will be available at http://joeblogshelloworld.appspot.com. So open your application page as follows:
http://<app-id>.appspot.com/helloworld.jsf
If all has gone well, then you should see the same Hello, World message that you saw when running your application locally.
Summary
This concludes part 1 of this article, where we saw how to set up the GAE SDK, create a new GAE project, and configure JSF 2.0 and Weld. We also tested that our JSF page was working by evaluating an EL expression, and confirmed that our Weld bean could be found by using it as a backing bean for our page.
In the next part of this series, we'll spend some time looking at the application development process, and how to make use of the APIs that Google App Engine provides for security, database access and data caching, among other things.
