

I had the privilege today of receiving some expert tutelage on Forge Addon development in Eclipse from the Forge Team’s George Gastaldi, and I was so impressed by how easy it was that I’m going to describe the process step by step so that you too can experience the pleasure of writing a Forge addon! This guide is written from the perspective of a complete Forge noob, so you can rest assured that it has made a very strong attempt to capture all the little important details. Also, while the addon itself won’t actually do that much, we’ll try to cover all the basics which will hopefully provide the solid foundation you need to be able to implement more complex features.
Setting up your environment
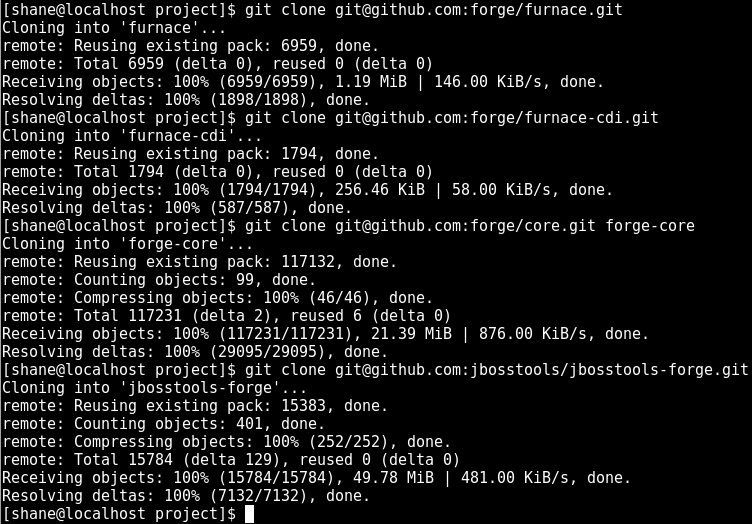
I strongly recommend that you work with the latest trunk of Forge, so fire up your terminal window and start by cloning the following repositories from GitHub:
https://github.com/forge/furnace
https://github.com/forge/furnace-cdi
https://github.com/forge/forge-core
https://github.com/jbosstools/jbosstools-forge
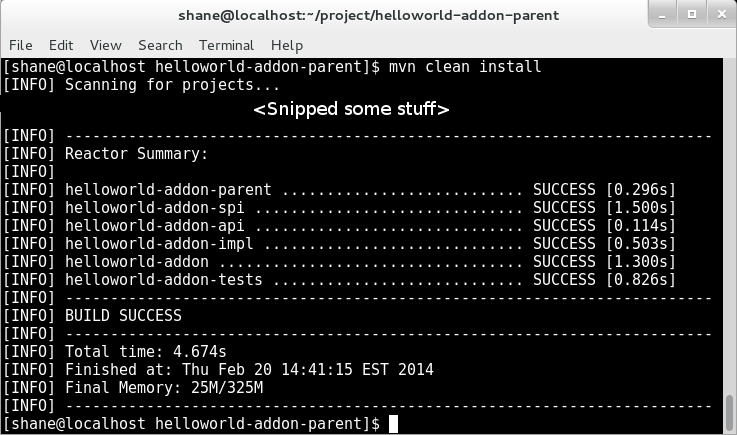
Once you have them all build each of them using Maven, making sure to skip the tests. You’ll need Maven 3.1 or higher for this step:
cd furnace
mvn clean install -Dmaven.test.skip=true
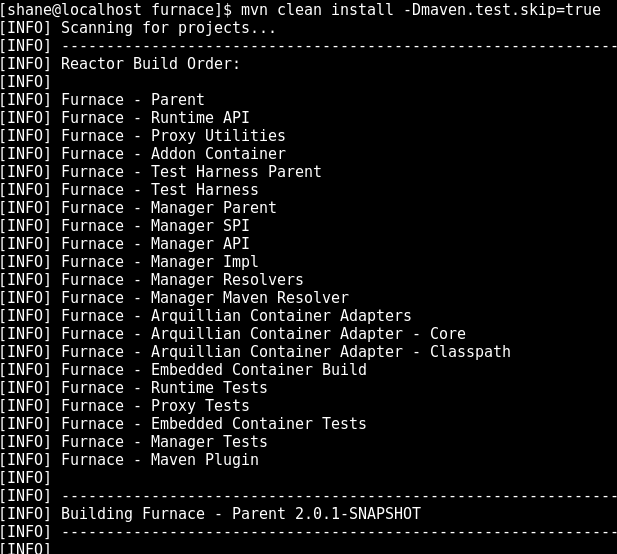
If all goes well you’ll get a BUILD SUCCESS message at the end:

Continue by building the other three projects (furnace-cdi, forge-code and jbosstools-forge) in order using the same Maven command.
Installing Forge
Once everything has built successfully, it’s time to install Forge. Open the forge-core/dist/target directory where you’ll find some zip files containing the Forge distribution:
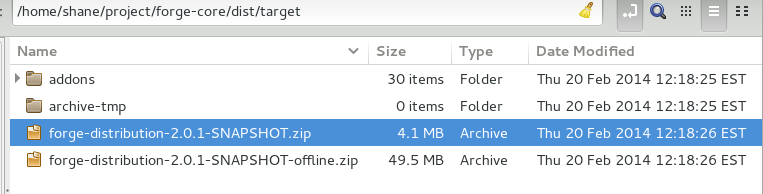
You have a choice here, you can either use the (smaller) distribution zip which doesn’t come pre-packaged with all of the core addons, or you can use the larger offline distribution which has the addons packaged also. For now, I recommend you use the offline distribution, so extract it to its own folder somewhere. I generally like to install tools like this into a dedicated apps folder, and if you’re on a *nix based OS I recommend creating a symbolic link also:

Once that’s done, you need to create a FORGE_HOME environment variable pointing to this directory, and add the $FORGE_HOME/bin directory to your path (this will allow you to execute the forge shell from anywhere). This is an OS-specific step so it’s up to you to complete this by yourself. When that’s done, run the forge command from a command prompt.
(Note: If you didn’t install the offline distribution, you’ll be prompted to install the core addons. When you start forge, it will attempt to install the latest released versions, however in our case we want to install the artifacts that we just built ourselves, so to do that we must first run forge -i core,2.0.1-SNAPSHOT - alternatively just use the offline distribution and save yourself a lot of trouble.)

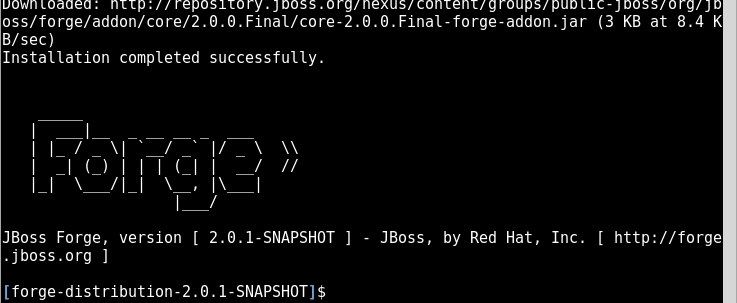
Forge will download a bunch of stuff and then prompt you to confirm the installation, so select Y and press Enter again.

Eventually the installation will complete and you’ll be sitting at the Forge command prompt:
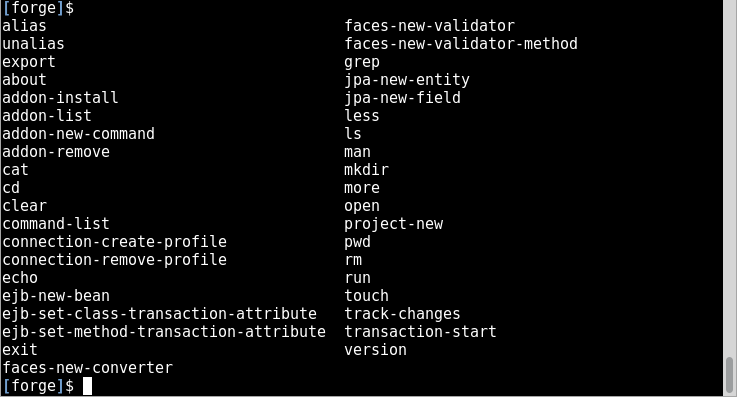
From here you can press the tab key to see the available commands:
We’ve successfully set up the Forge shell! Let’s quit out for now by typing exit then pressing enter and we’ll go through the steps to install the JBoss Tools Forge plugin in Eclipse.
Installing the Forge Eclipse Plugin
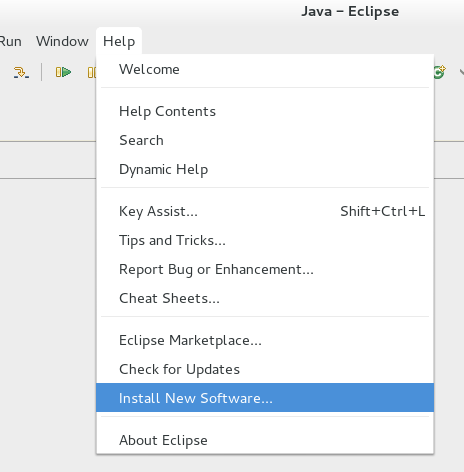
At the time of writing I’m using the latest release version of Eclipse, Kepler SR1. If you are using an older version of Eclipse then I recommend that you update to the latest, otherwise results might be unpredictable. The first step in installing the Eclipse plugin is to start up Eclipse, then go to the Help -> Install New Software… menu option:
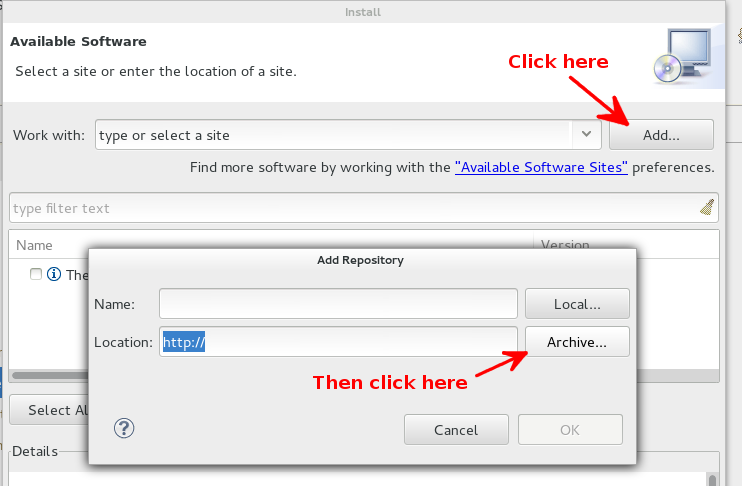
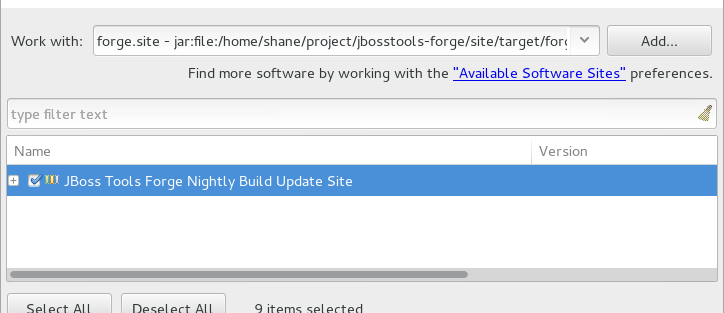
Then click the Add button, then in the popup window click Archive:
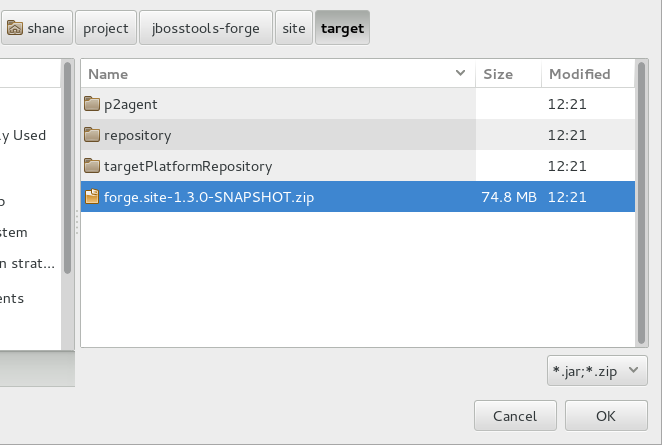
Browse to the jbosstools-forge/site/target directory, select the forge.site.XXX zip file and click OK:
Click OK again in the Add Repository window, then select the checkbox next to JBoss Tools Forge Nightly Build Update Site, then click the Next button:
You’ll be prompted to review the install details, so click the Next button again. You’ll be asked to review and accept the terms of the license agreement, so after accepting them click the Finish button and Eclipse will go ahead and install the plugin. If you get a security warning about unsigned content don’t panic; it’s just a warning and it's fine to click OK here. Once finished, Eclipse will inform you that it needs to be restarted so go ahead and click the Yes button. After Eclipse has restarted you can confirm that the Forge plugin has been successfully installed by pressing Ctrl + 5, which will present you with the following popup window:
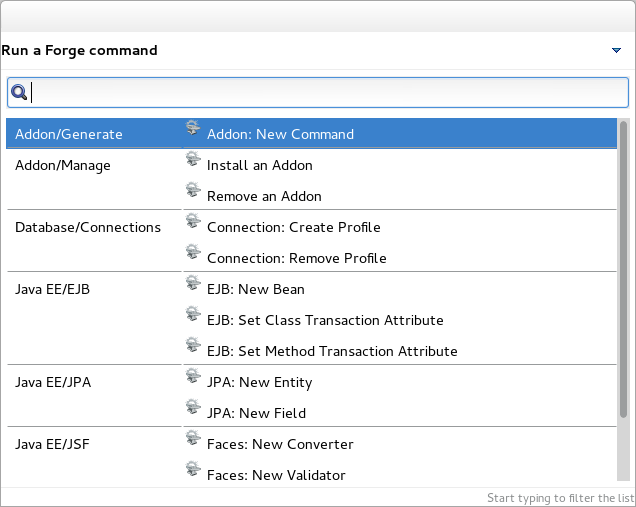
If you can see the Forge command window after pressing Ctrl + 5, then congratulations on making it this far! Next we’ll go ahead and create our Forge Addon project.
Creating a Forge Addon Project
Forge does a great job of doing the heavy lifting when it comes to creating a new Addon. Let’s create the initial project structure for our addon by opening the Forge command window in Eclipse with Ctrl + 5, then scrolling down until we find the Project/Generation - Project: New option:

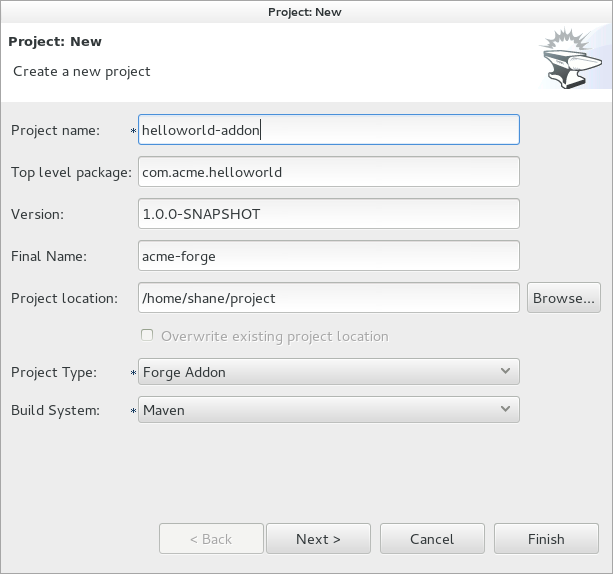
Clicking on the Project: New option gives us a dialog window that lets us enter some basic details for our addon project. Fill in the details for the project name, top level package, version, final name and project location. Select Forge Addon for the project type and leave the Build system default of Maven, then click Next.
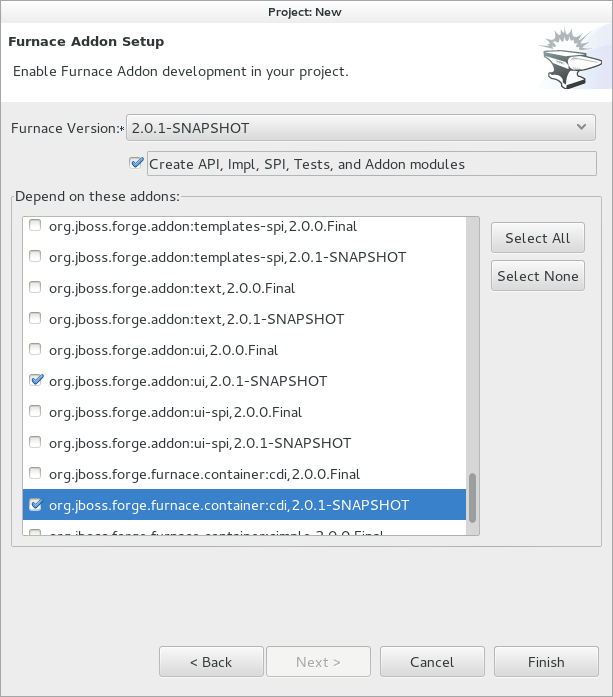
On the next screen, click the checkbox next to Create API, Impl, SPI, Tests and Addon modules and select the following addons from the addon list:
org.jboss.forge.addon:projects
org.jboss.forge.addon:ui
org.jboss.forge.furnace.container:cdi
After you’ve selected these addons, click the Finish button to generate the new project.
After grinding away for a few seconds you should see the following new projects in the Eclipse project explorer:
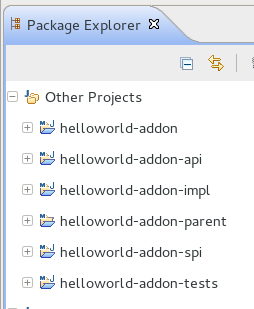
Our new addon project is created! Next we’ll start adding some basic functionality.
Making the Addon do something
This is where we get into the exciting stuff. Let’s start off by creating a new class in the impl project, under the com.acme.helloworld.ui package called HelloWorldUICommand. Once you’ve created this class, edit its code and make it extend AbstractUICommand:
package com.acme.helloworld.ui;

import org.jboss.forge.addon.ui.command.AbstractUICommand;

public class HelloWorldUICommand extends AbstractUICommand {

}
Once that’s done, tell Eclipse to add the unimplemented methods:
package com.acme.helloworld.ui;

import org.jboss.forge.addon.ui.command.AbstractUICommand;
import org.jboss.forge.addon.ui.context.UIBuilder;
import org.jboss.forge.addon.ui.context.UIExecutionContext;
import org.jboss.forge.addon.ui.result.Result;

public class HelloWorldUICommand extends AbstractUICommand {

    @Override
    public void initializeUI(UIBuilder builder) throws Exception {
        // TODO Auto-generated method stub

    }

    @Override
    public Result execute(UIExecutionContext context) throws Exception {
        // TODO Auto-generated method stub

    }

}
Let’s write a bare minimum amount of code so that we can install our plugin and try it out. Implement the execute() method by adding the following code:
package com.acme.helloworld.ui;

import org.jboss.forge.addon.ui.command.AbstractUICommand;
import org.jboss.forge.addon.ui.context.UIBuilder;
import org.jboss.forge.addon.ui.context.UIExecutionContext;
import org.jboss.forge.addon.ui.result.Result;
import org.jboss.forge.addon.ui.result.Results;

public class HelloWorldUICommand extends AbstractUICommand {

    @Override
    public void initializeUI(UIBuilder builder) throws Exception {
        // TODO Auto-generated method stub

    }

    @Override
    public Result execute(UIExecutionContext context) throws Exception {
        return Results.success("Hello World");
    }

}
Once that’s done, save the class and build the project by running mvn clean install in the parent folder of your addon project:
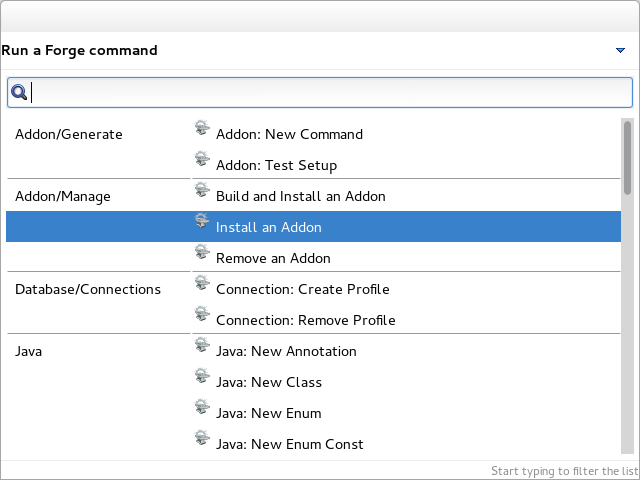
Then in Eclipse, select the helloworld-addon project (or whatever you have called it), press Ctrl + 5 to display the Forge command window and select the Addon/Manage - Install an Addon command:
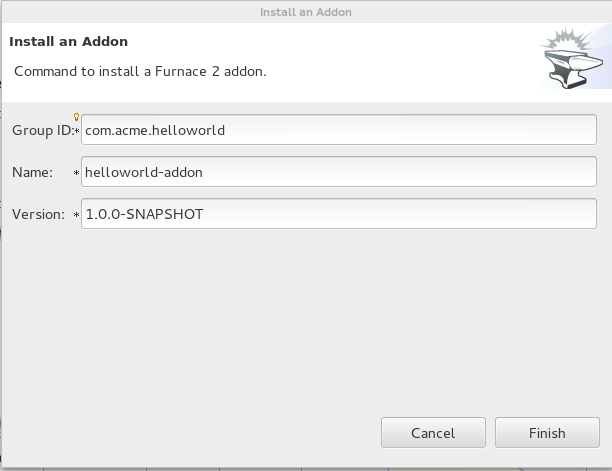
Leave the default values in the Install an Addon window unchanged and click the Finish button:
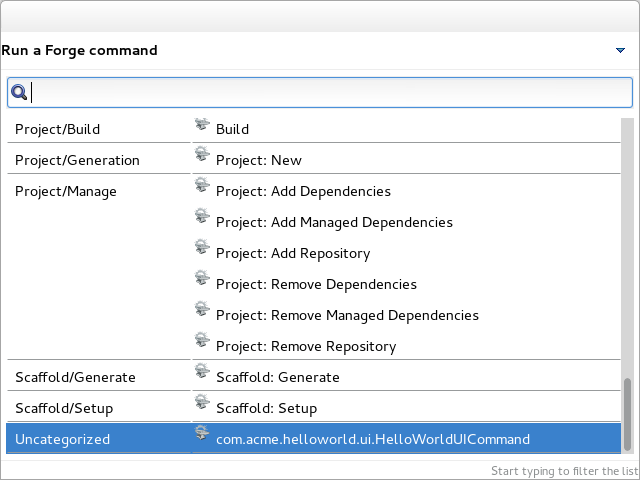
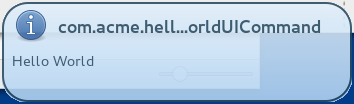
If everything has gone to plan, you should notice a little popup window in the bottom right corner of the screen confirming that the addon was successfully installed. We can test our new addon immediately by pressing Ctrl + 5 and scrolling down until we find our new command:
Clicking on the command should give us another popup window that displays our hello world message:
Creating User Interface Elements
The next step is to create some user interface elements that prompt the user for input. We’ll start simple by injecting a simple text input control and adding it to the dialog screen for our addon - here’s a complete code listing:
package com.acme.helloworld.ui;
import javax.inject.Inject;
import org.jboss.forge.addon.ui.command.AbstractUICommand;
import org.jboss.forge.addon.ui.context.UIBuilder;
import org.jboss.forge.addon.ui.context.UIExecutionContext;
import org.jboss.forge.addon.ui.input.UIInput;
import org.jboss.forge.addon.ui.result.Result;
import org.jboss.forge.addon.ui.result.Results;
public class HelloWorldUICommand extends AbstractUICommand {
@Inject UIInput<String> input;
@Override
public void initializeUI(UIBuilder builder) throws Exception {
builder.add(input);
}
@Override
public Result execute(UIExecutionContext context) throws Exception {
return Results.success("Hello World");
}
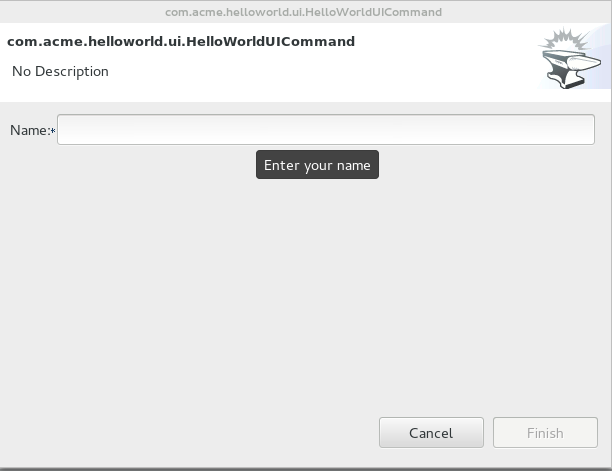
}Rebuild the project the same way as before, and reinstall the addon from the Forge command screen (Ctrl + 5 and select Addon/Manage : Install an Addon). Press Ctrl + 5 again and select HelloWorldUICommand, and you should now see the following dialog window:

We can customize our input control further by adding a @WithAttributes annotation - add the following import:
import org.jboss.forge.addon.ui.metadata.WithAttributes;Then add the @WithAttributes annotation to the UIInput:
@Inject @WithAttributes(label = "Name", required = true, description = "Enter your name")
    UIInput<String> input;
The control can be customized by setting the various member values:
label - The label for the input
required - Make the input a required field
description - The description when you mouse over the field.
Save your class, then build and reinstall the addon following the same steps as before. Execute the addon command using Ctrl + 5 and you should now see this:
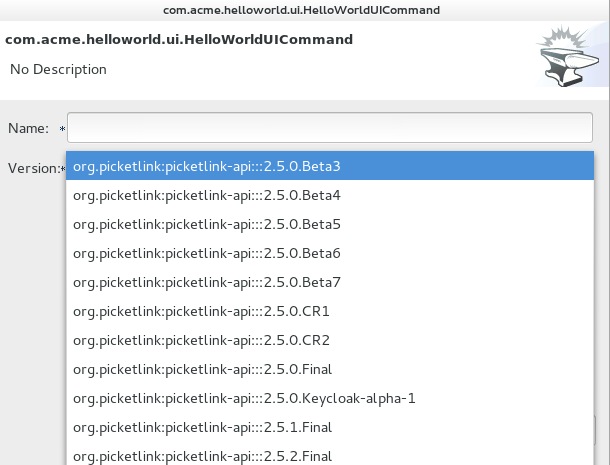
We can now begin to see how simple it is to build a user interface for our addon. Let’s extend it further by adding a select control that allows you to select a Maven dependency. In this example I’ll use the PicketLink project as our guinea pig. We’ll need to @Inject a DependencyResolver to locate the dependencies that we’re interested in, and a UISelectOne control to allow the user to select one of the dependencies. Add this code to your class:
@Inject DependencyResolver dependencyResolver;

@Inject @WithAttributes(label = "Version", required = true, description = "Select the version of PicketLink")
private UISelectOne<Coordinate> version;

@Override
public void initializeUI(UIBuilder builder) throws Exception {
    builder.add(input);

    DependencyQuery query = DependencyQueryBuilder
            .create("org.picketlink:picketlink-api")
            .setFilter(new NonSnapshotDependencyFilter());

    List<Coordinate> coordinates = dependencyResolver.resolveVersions(query);
    version.setValueChoices(coordinates);
    builder.add(version);
}
The DependencyQuery is used to to declare the criteria that we’ll use to locate the dependencies we want, and the NonSnapshotDependencyFilter parameter tells the query that we’re only interested in non SNAPSHOT releases. The Coordinate class is used to represent a specific Maven dependency and contains property values for the dependency’s groupId, artifactId and so forth. We populate the select control with our list of Coordinates and finally add the control to the form via the builder.add() method. Once you’re done the complete code listing should look like this:
package com.acme.helloworld.ui;

import java.util.List;

import javax.inject.Inject;

import org.jboss.forge.addon.dependencies.Coordinate;
import org.jboss.forge.addon.dependencies.DependencyQuery;
import org.jboss.forge.addon.dependencies.DependencyResolver;
import org.jboss.forge.addon.dependencies.builder.DependencyQueryBuilder;
import org.jboss.forge.addon.dependencies.util.NonSnapshotDependencyFilter;
import org.jboss.forge.addon.ui.command.AbstractUICommand;
import org.jboss.forge.addon.ui.context.UIBuilder;
import org.jboss.forge.addon.ui.context.UIExecutionContext;
import org.jboss.forge.addon.ui.input.UIInput;
import org.jboss.forge.addon.ui.input.UISelectOne;
import org.jboss.forge.addon.ui.metadata.WithAttributes;
import org.jboss.forge.addon.ui.result.Result;
import org.jboss.forge.addon.ui.result.Results;

public class HelloWorldUICommand extends AbstractUICommand {
    @Inject @WithAttributes(label = "Name", required = true, description = "Enter your name")
    UIInput<String> input;

    @Inject DependencyResolver dependencyResolver;

    @Inject @WithAttributes(label = "Version", required = true, description = "Select the version of PicketLink")
    private UISelectOne<Coordinate> version;

    @Override
    public void initializeUI(UIBuilder builder) throws Exception {
        builder.add(input);

        DependencyQuery query = DependencyQueryBuilder
                .create("org.picketlink:picketlink-api")
                .setFilter(new NonSnapshotDependencyFilter());

        List<Coordinate> coordinates = dependencyResolver.resolveVersions(query);
        version.setValueChoices(coordinates);
        builder.add(version);
    }

    @Override
    public Result execute(UIExecutionContext context) throws Exception {
        return Results.success("Hello World");
    }
}
Rebuild and reinstall the addon, then invoke it from the Forge command window - you should see something that looks like this:
We can use these newfound powers to make changes to an actual project. Let’s start by modifying our addon class so that it extends AbstractProjectCommand instead of AbstractUICommand:
public class HelloWorldUICommand extends AbstractProjectCommand {This will cause Eclipse to complain about unimplemented methods, so use Eclipse to generate them:
    @Override
    protected boolean isProjectRequired() {
        // TODO Auto-generated method stub
        return false;
    }

    @Override
    protected ProjectFactory getProjectFactory() {
        // TODO Auto-generated method stub
        return null;
    }
The isProjectRequired() method is used to determine whether this addon requires a project to execute. Since this is what we actually want, we’re going to return a value of true here:
    @Override
    protected boolean isProjectRequired() {
        return true;
    }
The getProjectFactory() method provides a reference to the currently selected project. To implement this method we first need to @Inject a ProjectFactory object into our addon class:
@Inject ProjectFactory projectFactory;Then we simply return this value in the method body:
    @Override
    protected ProjectFactory getProjectFactory() {
        return projectFactory;
    }
So far so good! Now, since our goal is to add some dependencies to our project we need to somehow take the selected Coordinate value from our UISelectOne control and use it to add a dependency to the current project. Lucky for us Forge provides all of the tools to make this happen - first of all we’re going to inject a DependencyInstaller into our class:
@Inject DependencyInstaller dependencyInstaller;Then, in the execute() method we’re going to use a DependencyBuilder to create a reference to the Dependency based on the Coordinate value contained in the UISelectOne control, after which we’ll tell the DependencyInstaller to install that Dependency into the selected project:
DependencyBuilder builder = DependencyBuilder.create();
builder.setCoordinate(version.getValue());

dependencyInstaller.install(getSelectedProject(context), builder);
The complete code listing should now look like this:
package com.acme.helloworld.ui;

import java.util.List;

import javax.inject.Inject;

import org.jboss.forge.addon.dependencies.Coordinate;
import org.jboss.forge.addon.dependencies.DependencyQuery;
import org.jboss.forge.addon.dependencies.DependencyResolver;
import org.jboss.forge.addon.dependencies.builder.DependencyBuilder;
import org.jboss.forge.addon.dependencies.builder.DependencyQueryBuilder;
import org.jboss.forge.addon.dependencies.util.NonSnapshotDependencyFilter;
import org.jboss.forge.addon.projects.ProjectFactory;
import org.jboss.forge.addon.projects.dependencies.DependencyInstaller;
import org.jboss.forge.addon.projects.ui.AbstractProjectCommand;
import org.jboss.forge.addon.ui.context.UIBuilder;
import org.jboss.forge.addon.ui.context.UIExecutionContext;
import org.jboss.forge.addon.ui.input.UIInput;
import org.jboss.forge.addon.ui.input.UISelectOne;
import org.jboss.forge.addon.ui.metadata.WithAttributes;
import org.jboss.forge.addon.ui.result.Result;
import org.jboss.forge.addon.ui.result.Results;

public class HelloWorldUICommand extends AbstractProjectCommand {

    @Inject ProjectFactory projectFactory;

    @Inject @WithAttributes(label = "Name", required = true, description = "Enter your name")
    UIInput<String> input;

    @Inject DependencyInstaller dependencyInstaller;

    @Inject DependencyResolver dependencyResolver;

    @Inject @WithAttributes(label = "Version", required = true, description = "Select the version of PicketLink")
    private UISelectOne<Coordinate> version;

    @Override
    public void initializeUI(UIBuilder builder) throws Exception {
        builder.add(input);

        DependencyQuery query = DependencyQueryBuilder
                .create("org.picketlink:picketlink-api")
                .setFilter(new NonSnapshotDependencyFilter());

        List<Coordinate> coordinates = dependencyResolver.resolveVersions(query);
        version.setValueChoices(coordinates);
        builder.add(version);
    }

    @Override
    public Result execute(UIExecutionContext context) throws Exception {
        DependencyBuilder builder = DependencyBuilder.create();
        builder.setCoordinate(version.getValue());

        dependencyInstaller.install(getSelectedProject(context), builder);

        return Results.success("Hello World");
    }

    @Override
    protected boolean isProjectRequired() {
        return true;
    }

    @Override
    protected ProjectFactory getProjectFactory() {
        return projectFactory;
    }
}
Rebuild and reinstall your addon, then select a project in Eclipse and invoke our addon from the Forge command window. Keep in mind that we’ll be adding some new dependencies to the project you select so make sure it’s not something too important! I suggest you use the addon project itself as it is quite easy to remove the dependencies afterwards. Enter any value for the Name field (since we’ve marked it as required we’re forced to at least enter something) and select one of the dependencies from the Version control:
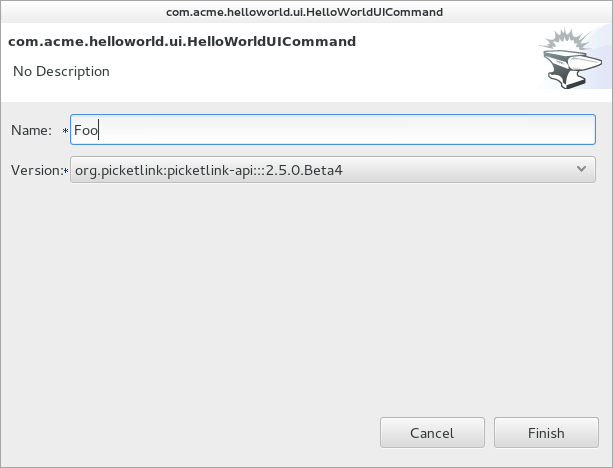
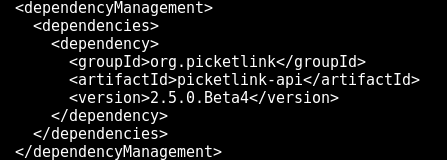
Click the Finish button and you should see the Hello World popup window appear briefly confirming that our addon ran successfully. To check it actually did something, open the project’s pom.xml in an editor and you should notice that Forge has added the selected dependency by declaring it in the <dependencyManagement> section:
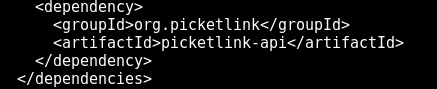
And also adding the dependency itself to the <dependencies> section:
Congratulations, you’ve made it to the end! You’ve now created your first useful Forge addon that can add dependencies to an existing project. Hopefully this guide has helped by providing a high level overview of the Forge Addon architecture and a beginner’s primer on creating a new Forge Addon.
Summary
In this guide we went through the steps to build and install both the Forge Shell and Forge Eclipse Plugin, then learned how to create a new Forge Addon project. We also learned how to build and install our Addon, create custom dialog windows and have our Addon make changes to an existing project. If you’d like to learn more about Forge, then the following resources are available:
Forge web site: http://forge.jboss.org/
Documentation: http://forge.jboss.org/docs/index.html
Source code: https://github.com/forge
Thanks for reading!
