
Overview
RichFaces Push allows you to perform realtime client side updates triggered via events from the server side. We integrate with the Atmosphere framework which provides various transport mechanisms according to concrete browser support(Comet, HTML5 WebSockets). On the server events are managed by integrating Java Messaging Service (JMS). This provide enterprise level messaging integration all the way to the browser!
In this blog I will describe our irc-client example application that was created to introduce the RichFaces push features. It provides the following functionality:
- Connect to the freenode.org IRC server
- Join a channel with choosen nickname
- Receive all channel messages (nick change, join, part...)
- Send messages to the channel
- Observe the list of joined users with real-time updates
In this blog I'm only going to review the important configuration, and source code snippets from the application. The full source code can be checked out from SVN so you can try it for yourself. Instructions for building and deploying the application is in the readme.txt.
Dependencies
To save time with application setup I have created a starter application using richfaces-archetype-simpleapp archetype. Next we need to update application pom.xml to add Atmosphere fremework dependency. For the client side a4j:push uses jquery-atmosphere.js plugin (added implicitly by the component renderer).
NOTE: that particular sample targeted for JBoss 6 Application Server. So we will use JBoss HornetQ available out of the box. Using RichFaces Push under Tomcat or Jetty requires additional JMS dependencies and configuration code. We will work on maven profiles and additional optional classes for that case also in future releases. At the moment the only place to review that configuration is with our developer demo which configured for tomcat using external HornetQ dependencies and configuration class for its initialization.
We need to add the atmosphere-runtime to the pom.xml. This is only needed if you are using the push component.
<dependency>
    <groupId>org.atmosphere</groupId>
    <artifactId>atmosphere-runtime</artifactId>
</dependency>
Also as the demo shown there provides simple IRC client we added one more dependency:
<dependency>
    <groupId>pircbot</groupId>
    <artifactId>pircbot</artifactId>
    <version>1.4.2</version>
</dependency>
PircBot is a simple framework for writing IRC bots.
Configuring JMS
Lets first discuss why we need JMS at all? Why not just use for example push context object? The answer is pretty straightforward. Usage of JMS at the back-end provides excellent integration with EE containers, and advanced messaging services. It also frees you from managing various entities at your business layer. If you are already using JMS for messaging in your application - you will just continue to send the same messages and you just need to to declare a4j:push at views which should listen that topics.
We assume that you're familiar with JMS so will not provide details here. To learn more about it visit JMS documentation.
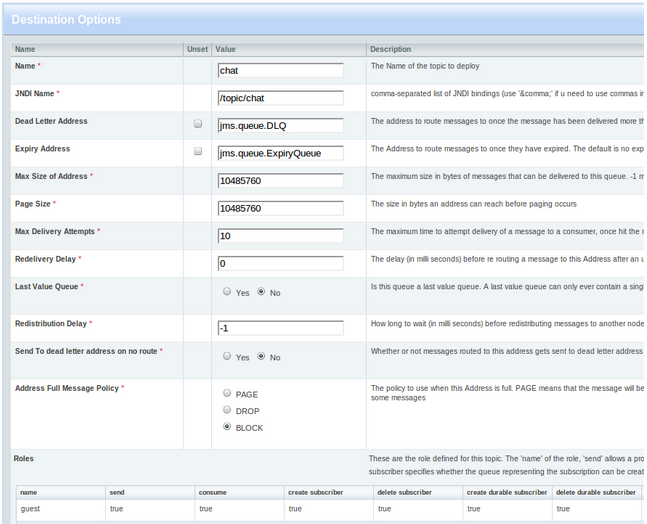
Now it is time to configure JMS for our example. We will use JBoss 6 AS for application deployment as mentioned in dependencies section. So we'll use JMS server bundled with JBoss AS. We need to create topics which will be used by Push to check for the messages. Let's start JBoss 6 AS and open http://localhost:8080/admin-console. We will use default admin/admin credentials to log-in. Then click the JMS topics in navigation menu and create new JMS topic with the following settings:
Name: chat
JNDI name: /topic/chat All the others: by default.
In the same form we need to add roles for that topic. For that demo application we will create single role with next parameters:
Name: guest
Send: yes
Consume: yes
create subscriber: yes
delete subscriber: yes
create durable subscriber: yes
delete durable subscriber: yes
IMPORTANT: The last two options are critical for push functionality as we using durable subscriptions in order to be able to receive all the events including ones which were sent while the push was not connected to the server. So if they are set to false - push will not be able to register subscribers.
So here is what you should see after JMS setting done:
That's all. Now we are ready with JMS configuration.
NOTE: if you not familiar with JBoss configuration using admin-console visit JBoss AS Administration Console User Guide.
Web Application Configuration
Now let's add application settings required by RichFaces Push. We need an additional filter and a few context-param's to be added. Here is what we used for that demo application:
<context-param>
    <param-name>org.richfaces.push.jms.connectionUsername</param-name>
    <param-value>guest</param-value>
</context-param>
<context-param>
    <param-name>org.richfaces.push.jms.connectionPassword</param-name>
    <param-value>guest</param-value>
</context-param>
<filter>
    <filter-name>PushFilter</filter-name>
    <filter-class>org.richfaces.webapp.PushFilter</filter-class>
    <async-supported>true</async-supported>
</filter>
<filter-mapping>
    <filter-name>PushFilter</filter-name>
    <servlet-name>Faces Servlet</servlet-name>
</filter-mapping>
Let's review those parameters in details. At first we need the PushFilter to be installed and mapped to Faces Servlet. It will handle the push request and serve event using the Atmosphere runtime. And connectionUserName and connectionPassword context parameters are needed in order to defined the credentials used to work with JMS for connecting and subscribing to topics.
Here is the table with all the parameters which could be used in your application:
| context-param Name | Default value | Description |
|---|---|---|
| org.richfaces.push.jms.connectionFactory | /ConnectionFactory | JMS connection factory JNDI name |
| org.richfaces.push.jms.topicsNamespace | /topic | used as a root name from which all topics are resolved: i.e. 'chat' topic by default will be looked up via /topics/chatJNDI name. |
| org.richfaces.push.jms.connectionUsername | - | Username used for connection and topics creation/listening |
| org.richfaces.push.jms.connectionPassword | - | Password used for connection and topics creation/listening |
Note: there are also JNDI references to credentials strings available:
- java:comp/env/org.richfaces.push.jms.connectionUsername
- java:comp/env/org.richfaces.push.jms.connectionPassword
An alternative to using web.xml definitions is to provide all the parameters using properties file org/richfaces/push.properties.
TopicsContext initialization
Now we need to initialize org.richfaces.application.push.TopicsContext with the JMS topics we will listen for. For this purpose we created a JSF 2 System Event listener which handles PostConstructApplicationEvent:
public class TopicsInitializer implements SystemEventListener {
   public void processEvent(SystemEvent event) throws AbortProcessingException {
       TopicsContext topicsContext = TopicsContext.lookup();
       Topic topic = topicsContext.getOrCreateTopic(new TopicKey("chat"));
       topic.setMessageDataSerializer(DefaultMessageDataSerializer.instance());
       topic.addTopicListener(new SessionTopicListener() {...});
   }
  public boolean isListenerForSource(Object source) {
       return true;
   }
}
and registered it in faces-config:
<application>
    <system-event-listener>
        <system-event-listener-class>org.ircclient.listeners.TopicsInitializer</system-event-listener-class>
        <system-event-class>javax.faces.event.PostConstructApplicationEvent</system-event-class>
    </system-event-listener>
</application>
With this we have created new topic in TopicContext with chat name (the same as we defined configuring the JMS).
Actually MessageDataSerializer and TopicListener creation are optional, so let's briefly describe the main idea of these objects.
- Messages serializer is used to serialize the message to the expected format for passing to the client. By default built-in serializer will serialize the message data to JavaScript.
- Session topic listener is used to handle subscriptions (pre and post-processing) and unsubscription events. This could be used for example in order to check user permissions prior to connecting to some topic and perform some additional post-processing after some push component successfully attached to topics. In the sample there are just logging used so the code is omitted there.
Application Code
We are done with settings and push initialization stuff, and it's time to actually explore the example code to see how we manage the IRC connections, and how push is used for page updates according to server-side events.
Logging to IRC
This section is not directly related to Push but describes the code used for connection to IRC. Here is the simple page used:
<rich:panel header="Connect to IRC">
    <h:form>
        <rich:messages style=”color:red”/>
            <h:panelGrid columns="2">
                <h:outputText value="Your nickname:" />
                <h:inputText required="true" id="name" value="#{chatBean.userName}" />
                <h:outputText value="Channel:" />
                <h:outputText value="RichFaces" style="font-weight:bold"/>
                <h:outputText value="Server:" />
                <h:outputText value="irc.freenode.org" style="font-weight:bold"/>
            </h:panelGrid>
        <h:commandButton value="Connect" action="#{chatBean.connect}" />
    </h:form>
</rich:panel>
It's rendered as:
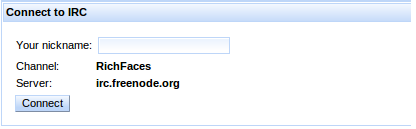
Note that for simplicity purposes the channel and server names are using constants. In the future we plan to extend the sample with ability to open multiple channels and so on..
And here is the ChatBean.java used:
@ManagedBean
@SessionScoped
public class ChatBean extends PircBot implements Serializable {
private static final String SERVER_URL = "irc.freenode.org";
private static final int SERVER_PORT = 6667;
private static final String CHANNEL_PREFIX = "#";
private static final String SUBTOPIC_SEPARATOR = "_";
private static final String DEFAULT_CHANNEL = "richfaces";
private String channelName;
private String message;
public String connect() {
       try {
           this.connect(SERVER_URL, SERVER_PORT);
           this.joinChannel(CHANNEL_PREFIX + DEFAULT_CHANNEL);
           channelName = DEFAULT_CHANNEL;
       } catch (NickAlreadyInUseException e) {
           FacesContext.getCurrentInstance().addMessage(null,
               new FacesMessage(FacesMessage.SEVERITY_ERROR, this.getName() + " nick
               already in use", this.getName()
               + " nick already in use"));
           return null;
       } catch (IOException e) {
           FacesContext.getCurrentInstance().addMessage(null,
               new FacesMessage(FacesMessage.SEVERITY_ERROR, "Sorry, server unresponsive.
               Try again later.",
               "Sorry, server unresponsible. Try again later."));
           return null;
       } catch (IrcException e) {
           FacesContext.getCurrentInstance().addMessage(null,
               new FacesMessage(FacesMessage.SEVERITY_ERROR,
                   "Sorry, we encountered IRC services problems. Try again later.",
                   "Sorry, we encountered IRC services problems. Try again later."));
        return null;
       }
       return "chat";
   }
...
}
As you can see our bean extends the PirBot abstract class. So we just using PircBot api in order to get connected to server. And performing redirect to most interesting for us chat.xhtml page.
Client main page
Screenshot below shows you the result we want to achieve on that page:
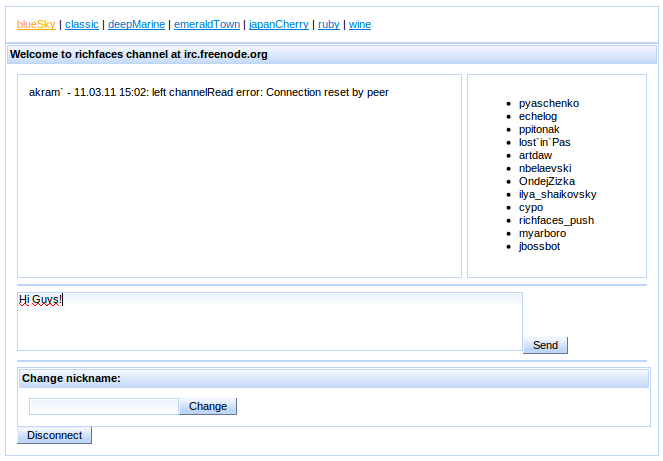
Here is the complete listing of the chat.xhtml page. We'll review it in details below:
<script>
function getMessageString(data){
return data.author + " - " +data.timestamp+ ": " + data.text;
}
</script>
<rich:panel header="Welcome to #{chatBean.channelName} channel at #{chatBean.serverName}"
id="chatpanel">
<rich:panel styleClass="chatOutput" bodyClass="#{chatBean.channelName}Output" />
<rich:panel styleClass="chatList">
    <rich:list value="#{chatBean.users}" var="user" id="users" type="unordered">
        #{user.nick}
    </rich:list>
</rich:panel>
<br clear="all" />
<hr />
<h:form>
<a4j:push address="#{chatBean.listSubtopic}@chat"
onerror="alert(event.rf.data)">
<a4j:ajax event="dataavailable" render="users" execute="@none" />
</a4j:push>
<a4j:push address="#{chatBean.messagesSubtopic}@chat"
onerror="alert(event.rf.data)" ondataavailable="jQuery('<div/>').
prependTo('.#{chatBean.channelName}Output').text(
getMessageString(event.rf.data))" />
<h:inputTextarea value="#{chatBean.message}" rows="3" style="width:80%" id="nm" />
<a4j:commandButton value="Send" action="#{chatBean.send}" render="@none" execute="@form" />
</h:form>
<hr />
<h:form>
<rich:panel header="Change nickname:">
<h:inputText valueChangeListener="#{chatBean.changeNick}" id="cn" />
<a4j:commandButton value="Change" execute="@form" render="@none"/>
</rich:panel>
<h:commandButton value="Disconnect" action="#{chatBean.leave}"/>
</h:form>
</rich:panel>
I will show you two options of performing push updates.
- Using ondataavailable JavaScript handler which will grab the data from the JMS event directly on the client.
- Using a4j:ajax behavior to trigger an Ajax request which will perform partial update when the push informs us about server event.
So the first panel:
<rich:panel styleClass="chatOutput" bodyClass="#{chatBean.channelName}Output" />
is just a container for the chat text which will be updated via JavaScript.
And the second panel:
<rich:panel styleClass="chatList">
<rich:list value="#{chatBean.users}" var="user" id="users" type="unordered">
#{user.nick}
</rich:list>
</rich:panel>
contains the rich:list component which displays the users connected to the channel. It will be updated via an Ajax request that is triggered when the event about list change is populated at server side.
Client side updates on server-side events using JavaScript
Let's review the first a4j:push component more closely:
<a4j:push address="#{chatBean.messagesSubtopic}@chat" onerror="alert(event.rf.data)"
ondataavailable="jQuery('<div/>').prependTo('.#{chatBean.channelName}Output').
text(getMessageString(event.rf.data))" />
It's used to get the messages into the main chat window. Here is the TopicContext declaration and main methods from the ChatBean which are generates events for that push:
import org.richfaces.application.push.TopicKey;
import org.richfaces.application.push.TopicsContext;
...
private transient TopicsContext topicsContext;
public String getMessagesSubtopic() {
   return this.getUserName() + SUBTOPIC_SEPARATOR + channelName;
}
private TopicsContext getTopicsContext() {
if (topicsContext == null) {
topicsContext = TopicsContext.lookup();
}
return topicsContext;
}
@Override
protected void onMessage(String channel, String sender, String login, String hostname, String message) {
   try {
       Message messageObject = new Message(message, sender, DateFormat.getInstance().format(
new Date()));
       getTopicsContext().publish(new TopicKey("chat", getMessagesSubtopic()), messageObject);
   } catch (MessageException e) {
       LOGGER.error(e.getMessage(), e);
   }
}
public void send() {
   this.sendMessage(CHANNEL_PREFIX + channelName, message);
   try {
       Message messageObject = new Message(message, this.getName(),
DateFormat.getInstance().format(new Date()));
       getTopicsContext().publish(new TopicKey("chat", getMessagesSubtopic()), messageObject);
   } catch (MessageException e) {
       LOGGER.error(e.getMessage(), e);
   }
}
onMessage method - just overriden PircBot method and it's invoked when the message comes from the other chat users. And send method is invoked when we are sending a message. This is a standard JSF action of the send button.
As you can see in order to raise an event for a4j:push we just publish it to the TopicContext. publish method accepts two parameters:
- TopicKey key - adress which consist of topic and subtopic names.
- Object data - actual data passed to client side event.
Messages subtopic generated by getMessagesSubtopic() method used by a4j:push component on the page and is unique for every user and channel, so only current user will receive the event populated by the object.
The Message object passed as data is pretty simple POJO with three String properties - author, text and timestamp. It's later used on the client in push oncomplete to create formatted string by getMessageString(data) JavaScript method and later add to chat div:
<script>
    function getMessageString(data){
        return data.author + " - " +data.timestamp+ ": " + data.text;
    }
</script>
IMPORTANT: As was mentioned before the other way to publish an event is by just sending it to JMS bus. So you have no need to use our TopicContext in this common case. We've just used this approach for simple example as we have no components other than our simple JSF bean. See Additional Details section for more information about publishing via JMS bus.
Ajax updates on server-side events using a4j:ajax
Now let's review the second approach to perform updates according to events received by a4j:push:
<a4j:push address="#{chatBean.listSubtopic}@chat" onerror="alert(event.rf.data)">
    <a4j:ajax event="dataavailable" render="users" execute="@none" />
</a4j:push>
It's used to update the rich:list which shows the current channel users. Here is the main methods from the ChatBean which are generates events for that push:
public String getListSubtopic() {
   return this.getUserName() + SUBTOPIC_SEPARATOR + channelName + "List";
}
@Override
protected void onUserList(String channel, User[] users) {
   try {
       getTopicsContext().publish(new TopicKey("chat", getListSubtopic()), null);
   } catch (MessageException e) {
       LOGGER.error(e.getMessage(), e);
   }
}
@Override
protected void onJoin(String channel, String sender, String login, String hostname) {
   try {
       getTopicsContext().publish(new TopicKey("chat", getListSubtopic()), null);
       Message messageObject = new Message("joined channel", sender,
           DateFormat.getInstance().format(new Date()));
       getTopicsContext().publish(new TopicKey("chat", getMessagesSubtopic()), messageObject);
   } catch (MessageException e) {
       LOGGER.error(e.getMessage(), e);
   }
}
We are using the same publishing through TopicContext at server side just defining different subtopic for that a4j:push. And passing null as data because we do not planning to process anything at client side. That's where:
<a4j:ajax event="dataavailable" render="users" execute="@none" />
come in play. When push receives the event an ajax behavior sends a request which just perform rich:list render with new values. Pretty simple isn't it?
Additional Details
There I want to pay your attention to some details not covered within the article.
Single Connection
As you can see in this example we used two a4j:push component on a single page in order to demonstrate two different ways to process push events. It is important to know that this does not mean wo connections are getting opened. All the instances of the push component uses single connection and only the subscribed one gets the event for processing according to it's adress after some event is received. You can verify that by using Firebug for FireFox for example.
Publishing via JMS bus
JMS messages types supported by push are:
- ObjectMessage
- TextMessage
Corresponding data from getObject or getText passed to DataSerializer and getting serialized to the client data(to JavaScript using default serializer).
To be Continued...
And finally I want to announce topics which planned to be covered in next Push related articles.
Integration with CDI events
Being a first class citizen in JEE6 ecosystem CDI getting paid much attention during RichFaces development for sure. And support of CDI event system by a4j:push are also topic for upcoming separate blog entry!
And more...
There are a lot of possibilities with this component, too many to describe using just a single article. So follow our blogs or RichFaces twitter for any future examples and documentation updates related to this great component!
